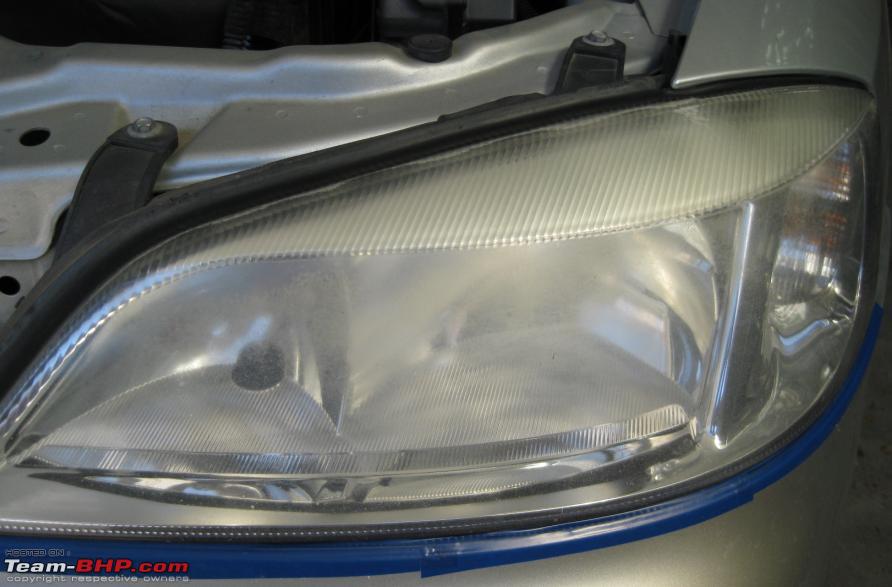
Reviving Clarity: The Ultimate Guide to Headlight Restoration
Headlights are your car’s eyes, guiding you safely through the darkest nights and the thickest fog. But over time, oxidation, yellowing, and microscopic scratches can turn once-bright beams into dull, hazy glows. If your headlights look more like foggy plastic than clear glass, don’t rush to replace them—instead, restore them to their former brilliance. Headlight restoration is a cost-effective, DIY-friendly solution that can dramatically improve visibility, enhance safety, and restore your vehicle’s curb appeal. This comprehensive guide will walk you through everything you need to know to revive clarity to your headlights, from understanding the problem to choosing the right tools and techniques.
Why Headlights Deteriorate Over Time
Headlight lenses are typically made from polycarbonate plastic, a durable material chosen for its lightweight and impact-resistant properties. However, this plastic is not invincible. Over time, it’s exposed to a barrage of environmental stressors that degrade its clarity:
- Oxidation: Ultraviolet (UV) rays from the sun break down the protective coating on the plastic, causing it to yellow and cloud over. This chemical reaction is similar to how paint fades on a sun-exposed surface.
- Pitting and Scratches: Road debris, sand, and gravel can create tiny scratches on the lens surface. These imperfections scatter light, reducing beam intensity and creating a diffuse glow instead of a focused beam.
- Chemical Contamination: Road salts, bug splatter, bird droppings, and even harsh cleaning products can leave residue that eats into the plastic, accelerating cloudiness.
- Aging Plastic: Even without external damage, polycarbonate naturally degrades as it ages, becoming more brittle and less transparent.
Left unchecked, these issues don’t just make your headlights look old—they reduce your visibility by up to 90%, according to the American Automobile Association (AAA). That means dimmer beams, longer braking distances, and increased risk of accidents in low-light conditions.
Signs Your Headlights Need Restoration
Not sure whether your headlights are just dirty or in need of serious restoration? Look for these telltale signs:
- Visible Yellowing or Browning: A yellow or brown tint is a clear sign of UV damage and oxidation.
- Cloudy or Milky Appearance: If the lens looks hazy or opaque, light isn’t passing through clearly.
- Scratches or Swirl Marks: Run your finger gently over the surface. If you feel roughness or see fine lines when viewed at an angle, scratches are present.
- Reduced Light Output: Compare the brightness of your beams to those of a newer vehicle at night. If they’re noticeably dimmer, restoration is likely needed.
- Longer Beam Distance: If the beam spreads out too much or doesn’t reach the road as far, clouding may be scattering the light.
If any of these symptoms sound familiar, it’s time to take action. The good news? You don’t need to be a mechanic to bring your headlights back to life.
DIY vs. Professional Restoration: Weighing Your Options
You have two main paths to headlight restoration: doing it yourself or hiring a professional. Each has its advantages, depending on your budget, time, and skill level.
DIY Restoration: Affordable and Rewarding
Pros:
- Cost-effective: Most DIY kits cost between $15 and $50, far cheaper than replacing headlights (which can run $200–$800 per pair).
- Quick and Convenient:
- You can complete the process in under an hour at home with basic tools.
- Customizable: You control the level of polishing and can reapply protective coatings as needed.
- Satisfaction: There’s a rewarding sense of accomplishment in restoring your own headlights.
Cons:
- Potential for Mistakes: Over-polishing or using the wrong abrasives can damage the lens permanently.
- Time-Consuming for Beginners: Preparing the surface, sanding, polishing, and sealing can take longer if you’re unfamiliar with the process.
- Inconsistent Results: Without the right tools or technique, you might end up with uneven clarity.
Professional Restoration: Fast and Flawless
Pros:
- Expertise: Professionals use specialized tools and high-grit compounds for superior results.
- Guaranteed Quality: Many auto shops offer warranties on their work.
- Time-Saving: You drop off your car and pick it up restored, often within a few hours.
Cons:
- Higher Cost: Professional restoration typically ranges from $75 to $200 per pair.
- Limited Control: You rely on the shop’s technique and materials.
For most drivers, a high-quality DIY kit is the best balance of cost, convenience, and results. But if your headlights are severely damaged or you prefer a flawless finish without the effort, a professional is worth considering.
Essential Tools and Materials for DIY Headlight Restoration
Before you begin, gather the right supplies. A good restoration kit should include (or you’ll need to source) the following items:
- Headlight Restoration Kit: Look for kits that include sandpaper (typically 400, 800, 1000, and 2000 grit), polishing compound, and a sealant or UV-protective clear coat.
- Masking Tape: To protect the surrounding paint and trim from sanding debris and polish.
- Microfiber Cloths: For cleaning and buffing without scratching the lens.
- Spray Bottle with Water: To keep the sandpaper moist during wet sanding (reduces heat and prevents scratches).
- Isopropyl Alcohol (90% or higher): For cleaning the lens thoroughly before and after polishing.
- UV-Protective Clear Coat: A final layer to shield the lens from future oxidation (e.g., 3M Clear Coat or similar).
- Optional: Electric Polisher or Drill with Polishing Attachment: Speeds up the polishing process significantly.
Popular DIY kits include brands like 3M, Sylvania, and Chemical Guys—all available at auto parts stores or online. Avoid cheap kits with low-grit sandpaper or inferior polishing compounds, as they can damage the lens.
Step-by-Step Guide to Restoring Your Headlights
Follow these steps carefully for the best results. Patience and attention to detail are key.
Step 1: Clean the Headlights Thoroughly
Before you begin sanding, remove all dirt, grime, and wax from the headlight lens.
- Wash the headlights with mild soap and water. Use a microfiber cloth to dry them.
- Spray the lens with isopropyl alcohol to remove any remaining residue. This ensures a clean surface for sanding and polishing.
- Use masking tape to cover the surrounding paint, rubber, and plastic to protect them from sanding debris and polish.
Step 2: Wet Sanding – The Foundation of Clarity
Wet sanding smooths out scratches and removes the oxidized layer. Always sand with water to prevent heat buildup and scratching.
- Start with 400-grit sandpaper: Soak the sandpaper in water for 5–10 minutes to soften it. Sand the lens in straight lines (not circles) using moderate pressure.
- Rinse the lens frequently to remove debris and keep the surface wet.
- Progress to 800-grit: Repeat the process, sanding in a perpendicular direction to the previous grit. This ensures even removal.
- Move to 1000-grit and then 2000-grit, each time changing direction. The final grit should leave the lens smooth to the touch.
Pro Tip: Use a sanding block or sponge to keep pressure even. Avoid pressing too hard—let the sandpaper do the work.
Step 3: Polish to Restore Shine
After sanding, the lens will look dull but smooth. Now it’s time to bring back the shine with polishing compound.
- Apply a small amount of polishing compound to the lens.
- Use a microfiber cloth to buff in circular motions. For faster results, attach a polishing pad to an electric polisher or drill.
- Work in sections until the lens is clear and reflective.
- Wipe away residue with a clean microfiber cloth.
If using a kit, follow the manufacturer’s instructions for polishing time and technique.
Step 4: Apply UV-Protective Clear Coat
This is the final—and most important—step. A protective coating seals the lens and prevents future oxidation.
- Mask off the headlight again if needed.
- Spray a thin, even layer of UV-protective clear coat over the lens. Hold the can 8–12 inches away to avoid drips.
- Allow the first coat to dry for 10–15 minutes (check the product instructions).
- Apply a second coat for added protection. Let it cure fully—usually 24 hours—before driving.
Some kits include a sealant paste instead of a spray. Either works, but sprays tend to be easier for beginners.
Step 5: Final Inspection and Maintenance
Once the coating is dry, inspect your work:
- Check for streaks, uneven spots, or dull areas. If needed, lightly re-polish and reapply clear coat.
- Remove the masking tape carefully.
- Test the headlights at night. The beams should be bright, focused, and free of haze.
To prolong the results, wash your headlights regularly with mild soap and water. Avoid using harsh detergents or abrasive cleaners. Consider applying a UV-protective spray or wax every few months to extend the life of your restoration.
Common Mistakes to Avoid
Even with the best intentions, it’s easy to make mistakes that can ruin your headlights. Here’s what to watch out for:
- Dry Sanding: Always sand with water. Dry sanding generates heat, which can warp or cloud the plastic.
- Skipping Grits: Jumping from 400-grit to 2000-grit without intermediate steps can leave deep scratches that polishing won’t remove.
- Over-Polishing: Too much pressure or time can thin the lens or create a wavy surface. Polish gently and evenly.
- Using Household Cleaners: Ammonia-based glass cleaners or bleach can damage the plastic. Stick to isopropyl alcohol.
- Skipping the Clear Coat: Without UV protection, oxidation will return within months. Always apply a protective layer.
Maintaining Restored Headlights
Your hard work doesn’t end once the restoration is complete. Proper maintenance keeps your headlights clear and bright for years.
- Regular Cleaning: Wash your headlights with car soap and water weekly. Avoid high-pressure washers that can strip the clear coat.
- Park in the Shade: Whenever possible, park your car in a garage or under cover to reduce UV exposure.
- Apply UV-Protective Products: Use a dedicated UV-resistant spray or wax every 3–6 months to maintain protection.
- Inspect Monthly: Check for cloudiness or yellowing. Catching issues early makes restoration easier.
- Avoid Automatic Car Washes: Brushes and harsh detergents can scratch and dull your lenses.
With consistent care, a properly restored headlight can stay clear for 1–3 years, depending on climate and usage.
When to Replace Instead of Restore
Restoration is a fantastic solution, but it’s not always the best option. Consider replacing your headlights if:
- Cracks or Large Chips: Structural damage compromises safety and cannot be repaired.
- Internal Fogging: If condensation forms inside the lens and won’t clear, moisture has entered the housing.
- Irreparable Yellowing: If the plastic is deeply oxidized and sanding doesn’t improve clarity, replacement may be necessary.
- Electrical Issues: Flickering or dim lights could indicate wiring or bulb problems, not just lens damage.
In these cases, consult a professional mechanic or auto electrician before proceeding.
The Environmental and Financial Benefits of Restoration
Choosing headlight restoration over replacement is not just good for your wallet—it’s good for the planet.
Plastic headlight lenses are not biodegradable, and manufacturing new ones consumes energy and resources. By restoring your existing lenses, you reduce plastic waste, lower your carbon footprint, and save money. According to the Environmental Protection Agency (EPA), every ton of recycled plastic saves approximately 7.4 cubic yards of landfill space.
Financially, restoration costs a fraction of replacement. For example, a $50 DIY kit can extend the life of your headlights by 2–3 years, saving you hundreds over their lifetime. Plus, clearer headlights improve fuel efficiency slightly by reducing drag from dim lights and can prevent costly accidents from poor visibility.
Final Thoughts: Drive with Confidence
Headlight restoration is a simple, rewarding process that can transform your nighttime driving experience. Whether you choose a DIY approach or professional help, the result is the same: brighter beams, improved safety, and a car that looks as good as it drives.
Don’t let cloudy headlights dim your journey. With the right tools, a little patience, and this guide, you can bring back the clarity and confidence you need on the road. So grab your kit, roll up your sleeves, and get ready to see the difference for yourself—one headlight at a time.